Anodizing is one of the most fascinating processes used to protect and enhance the appearance of aluminum surfaces. Whether for industrial applications or small DIY projects, anodize aluminum improves corrosion resistance, increases surface hardness, and allows for vibrant coloring. Asian Coater, a trusted name in the surface finishing industry, we continue to offer advanced coating and anodizing services that meet industrial needs.
Let’s explore the complete DIY anodizing process step by step, along with safety measures and helpful tips.
What is Aluminum Anodizing?
Anodizing is an electrochemical process that converts the metal surface into a durable, corrosion-resistant, and decorative oxide layer. Unlike paint or plating, which adds a separate layer on top of the metal, anodizing aluminum modifies the surface itself creating an oxide layer that becomes part of the metal. Asian Coater continues to provide superior aluminum anodizing services for industries that demand precision and quality, such as aerospace, automotive, architecture, and electronics.
How to Anodize Aluminum
If you want to try anodizing aluminum at home, it’s important to understand each step clearly and follow all safety precautions. The process involves cleaning, etching, anodizing, coloring (optional), and sealing.
DIY anodizing guide to help you achieve professional-quality results.
Step 1: Gather Materials and Equipment
You’ll need the following:
- Aluminum piece (clean and uncoated)
- Sulfuric acid (battery acid) – handle with care
- Distilled water
- Lead cathode (or stainless steel plate)
- Plastic container (acid-resistant)
- Power supply (DC source, ideally 12V to 20V)
- Rubber gloves, safety goggles, apron
- Baking soda (for neutralizing acid)
- Dyes (if you want to color the aluminum)
Asian Coater recommends always maintaining proper ventilation and wearing full protective gear during the process to ensure safety.
Step 2: Clean and Prepare the Aluminum
Proper cleaning is the foundation of a successful anodizing process. Any dirt, grease, or oxide layer can affect the final finish.
- Wash the aluminum part thoroughly with detergent and rinse with distilled water.
- For better results, soak it in a degreasing solution or use acetone to remove any oil residues.
- Lightly sand or polish the surface if you want a smoother finish.
Step 3: Etch the Surface
To remove the natural oxide layer and create a uniform texture:
- Submerge the cleaned aluminum in a sodium hydroxide (caustic soda) solution for about 2–3 minutes.
- Rinse it thoroughly with distilled water.
- This etching process helps expose a fresh aluminum surface, preparing it for effective anodizing aluminum.
Step 4: Set Up the Anodizing Bath
- Pour a mixture of sulfuric acid and distilled water (typically 1 part acid to 3 parts water) into your plastic container.
- Place the lead cathode (negative electrode) in the solution.
- Connect the aluminum piece to the positive terminal (anode) of your power supply.
- Carefully submerge both electrodes in the solution, ensuring they do not touch.
Step 5: Apply Electric Current
- Turn on the DC power supply to about 12–15 volts.
- Allow the process to run for 30–60 minutes, depending on the thickness of the oxide layer you want.
- Small bubbles will appear — this is oxygen being released, a sign that anodizing is occurring.
As the process continues, the aluminum’s surface transforms into a hard, porous oxide coating that can later absorb dyes or sealants.
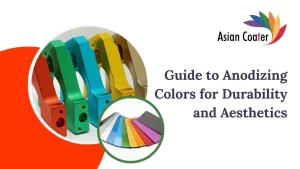
Step 6: Coloring (Optional)
One of the most creative steps in DIY anodizing is adding color. After anodizing:
- Rinse the aluminum piece in distilled water.
- Submerge it in a dye bath (available in many colors).
- The dye penetrates the porous surface, allowing you to achieve a range of vibrant hues.
Asian Coater offers high-quality anodizing aluminum finishes in custom colors for both decorative and protective purposes.
Step 7: Sealing the Surface
Finally, seal the surface to lock in the color and improve corrosion resistance.
- Boil the anodized aluminum in distilled water for 15–30 minutes.
- This closes the microscopic pores and hardens the oxide layer.
Once cooled and dried, your anodized aluminum piece will have a strong, glossy, and corrosion-resistant surface ready for use.
Also Read : Powder Coating Vs. PVDF Coating
Benefits of Anodizing Aluminum
- Corrosion Resistance: The oxide layer protects against oxidation and environmental damage.
- Durability: Increases surface hardness and scratch resistance.
- Aesthetic Appeal: Allows dye absorption for colorful finishes.
- Environmentally Friendly: The process is non-toxic and long-lasting.
- Maintenance-Free: Anodized aluminum requires minimal cleaning and upkeep.
Asian Coater continues to offer top-tier anodizing solutions that deliver all these benefits to industries and DIY users alike.
Safety Tips for DIY Anodizing
- Always wear goggles, gloves, and protective clothing.
- Work in a well-ventilated area.
- Never mix water into acid — always add acid to water slowly.
- Keep baking soda nearby to neutralize acid spills.
- Dispose of chemicals responsibly after use
Aluminum Anodizing is an electrochemical process that strengthens, protects, and beautifies aluminum surfaces. Whether done industrially or through DIY anodizing, it transforms ordinary aluminum into a durable, corrosion-resistant, and visually appealing material.
Through this step-by-step guide on how to anodize aluminum, you can safely perform anodizing aluminum at home and achieve professional-quality results.
Asian Coater continues to offer high-quality anodizing and surface treatment solutions backed by technology, experience, and reliability. Our commitment to precision, performance, and customer satisfaction makes them a trusted name in the world of aluminum anodizing — empowering both industries and creators to achieve excellence, one polished surface at a time.